Upsale Magic Module
for Miva Merchant
Version 1.00
May, 2005

by Magic Metal Productions
Upsale Magic Module
|
by Magic Metal Productions |
The module's essential features are:
|
Customer advisory
This module is designed for use by all Miva Merchant users. Some understanding of HTML coding is needed if you want to customize the discount message display, or if you want to use tokens for OpenUI or for the Viking Coders template modules. However, the module can be used effectively without knowledge of HTML or tokens.
NOTES:
|
NOTE: If you intend to use this module with OpenUI, you should install OpenUI before installing this module.
| Once you have created the discount, a discount messages will appear on the Watches category pages that looks something like this: | 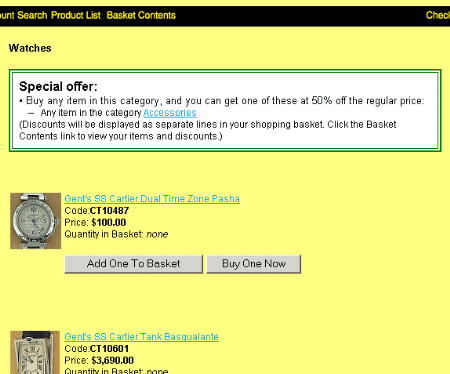 |
| On the Accessories category pages, the message will have the same format, but slightly different wording: | 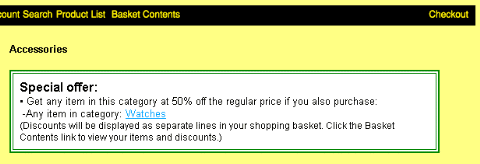 |
| The messages will also appear on the product pages for all applicable products: | 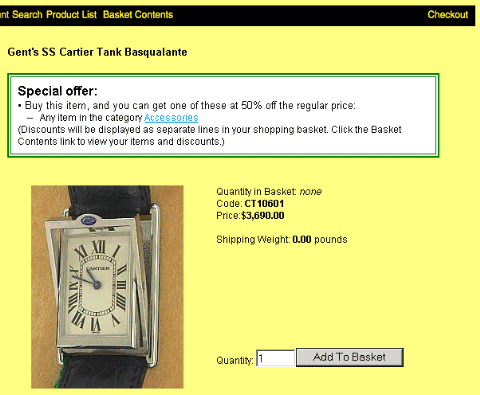 |
Required productsThese three text boxes allow you to specify the "X" products: the ones that customers must buy to activate the discount.
Discounted productsThese three text boxes allow you to specify the "Y" products: the ones that customers can buy at a discount after they place an "X" product in their basket. There are text boxes for Products, Categories, and Excluded products, all of which function as described above for required products. |
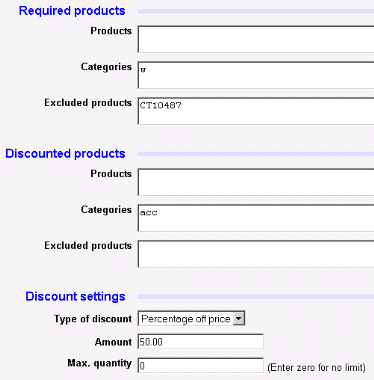 |
The Max. quantity text box allows you to set a limit on the number of "Y" products that a customer can purchase. For example, if the limit is set to 5, then even if a customer has 10 "X" items in their basket, they can only get a discount on 5 "Y" items; if they purchase more than 5 "Y's," they will pay the normal price for the rest.
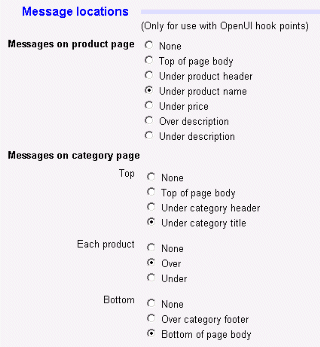
Message locationsIf you are using OpenUI hook points to display discount messages, these buttons control where the Upsale Magic discount messages will appear.
NOTE: These buttons are only operative if you are using OpenUI hook points. If you are using tokens, the locations of the tokens will control the display. (See the section on Compatibility, later in this document, for details.) On the product pages, you can select one of six different locations, or select None to remove the messages. On the category pages, there are more options, because there are two kinds of messages that can be displayed. There are messages that apply to the category ("Buy any item in this category, and get $10 off on YYY"); and there may also be messages that apply only to a specific product. Discount messages for the category can be displayed at the top or bottom of the page, or in both places, by making selections from the Top and Bottom buttons. Messages for a specific product can be displayed over or under the product, as selected by the Each product buttons. Any of these messages can also be removed from the pages by selecting None. |
 |
Message displayThere are two text boxes that allow you to control the discount messages that are displayed to customers when they view an "X" or "Y" product. You can put HTML formatting tags or descriptive text in the two boxes labeled HTML before messages and HTML after messages. This can be used to change the font or color of the messages, put additional text before or after them, enclose them in a table, etc. |
 |
The Template for basket rows text box is for use with some template modules, such as the Viking Coders Other Pages Templates. Upsale Magic creates discounts by putting extra "BasketCharge" entries in your shopping basket; it's the same mechanism that is used to add shipping and tax charges. The Viking module, and possibly others, do not display these BasketCharges as part of the normal Basket Contents screen.
Your customers should be able to view their discounts in the Basket Contents screen; they shouldn't have to wait till checkout to see how much they're saving. If you find that your store's Basket Contents display is not showing the Upsale Magic discounts, then you will use the basket token to provide it. (See the section on Compatibility, later in this document, for details.)
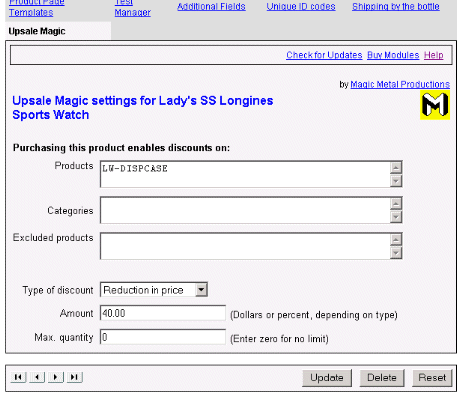
Product settingsThese settings control the discount for a particular product. The admin screen for this discount is simpler than the one for store discounts. The product itself is the "X," so there are no settings for that. There are three text boxes for Products, Categories, and Excluded products; these specify the "Y" products. There is also the drop-down menu for the Discount type, and the text boxes for Discount and Max. quantity. These settings are all used in the same way as the the ones described above for the store discount.NOTE: after setting up a product discount, if you want to turn it off, set the drop-down menu to "No discount." DON'T use the Delete button; that will delete the entire product. |
 |
When you are using hook points, the discount messages can be displayed at various locations on the category and product pages. The locations are selected by the buttons in the Message locations section of admin (described above).
%DOFUNC(g.MyToken|'../../system/upslmagic.mvc'|ProdMessages())%
%VAR(g.MyToken)%
The DOFUNC token calls a function in the Upsale Magic module, and places the returned HTML in a variable. The VAR token causes the variable to be displayed on the customer's screen. In the above example, the function is ProdMessages(), and the variable name is g.MyToken. The expression '../../system/upslmagic.mvc' is the path to the Upsale Magic module file in your store's Miva scripts directory. The actual path may vary from the above example, depending on your store's specific configuration.
The module provides four token functions, named ProdMessages, CatMessages, UpdateDiscount, and BasketRows. Their uses are described, along with the corresponding module tokens, in the table below. If you need more details, consult your OpenUI documentation.
The code determines the text or HTML that the token will generate. Upsale Magic provides the following tokens:
| Module token (in Viking format) | Function for OpenUI DOFUNC token | Display |
|---|---|---|
| %module|UpslMagic|prod|% | ProdMessages | Discount messages for a specific product. |
| %module|UpslMagic|cat|% | CatMessages | Discount messages for a category. |
| %module|UpslMagic|update|% | UpdateDiscount | This token does not display anything; it just updates the discount data for the customer. If you are using a template to display the Basket Contents screen, you should place this token at or near the top of the template, so that it can perform its function before the customer's purchases are displayed. Also, if you are using templates for the first (OINF) or second (OSEL) checkout screens, you should place this token near the top of those templates. |
| %module|UpslMagic|basket|% | BasketRows | Discount entries in basket. This token is for use in the Viking Other Page Templates module, and any other template that does not automatically display discount entries in the basket. |