Credit card payments via ANZ eGate
Module for Miva Merchant

Copyright © 2007
by Magic Metal Productions
Credit card payments via ANZ eGateModule for Miva Merchant
|
|
This document gives instructions on installing and using this module for Miva Merchant shopping-cart systems. If you need additional details, check with your Miva or hosting representative or documentation. You can also request help by email to support@TheMagicM.com.
This document applies to module version 1.00 for Miva Merchant version 5.x, released October 2007.
|
Customer advisory Storing credit card numbers places a responsibility on you to keep them safe. Be sure to turn on the Encryption feature of the Miva store. Also, use good practices for store security, such as changing passwords regularly, minimizing the number of people who have access, and updating your software as needed to remove any vulnerabilities. Your bank or payment-processing company may have their own rules for handling credit cards. Failing to follow these rules could be a violation of your merchant-account contract, and could subject you to fines or other penalties. You may want to check with your account representative before you start using the module. Internet crime and credit-card theft are serious problems today. For the sake of your business and your customers, please operate your store safely. |
The procedure for installing this module is the usual one for Miva Merchant modules: add the module to the site, and assign it to the store. The procedure is explained below in a bit more detail. If you need more information, see your Miva representative or documentation.
After the module is installed, you need to assign it to your store.
After the module is assigned to the store, a new "tab" link labeled Credit card payment via eGate will be seen at the top of the right-side frame. Clicking this link will take you to the setup page for the module. Some of these settings will need to be adjusted as soon as you install the module, before you try to process any transactions. At a minimum, you will need to enter your merchant ID and access code. All the settings are described in the next section; you should familiarize yourself with them all when you put the module on-line.
After completing the installation steps listed above, the first time you click the "eGate" link on the Payment Configuration page, you will need to enter your license key code. You should have received this code when you purchased the module, probably in an email. If you didn't receive a key, check with the dealer from whom you purchased the module.
Enter the key code in the text box on the page, review the Terms and Conditions, and then click the I agree checkbox. Then click the Update button in the lower right corner of the frame (you may need to scroll down to see it).
You may wish to include some of the information from the payment gateway in the emails that your store sends when orders are completed. If you are using a module that provides templates for these emails, you can add tokens to the templates to insert the information. The eGate module provides four pieces of data, which can be accessed by two different types of tokens.
If you aren't sure which type of token to use in a particular module, consult your module documentation.
The available data, and the tokens that insert it, are shown in the table below. Each token generates its own label: for instance, the transaction-number tokens will insert the text Transaction number: followed by the number itself. If customers check out of the store using a different payment module, the tokens will not generate any text.
| Information | Token for Miva templates | Tokens for module templates |
|---|---|---|
| Transaction number | &mvt:global:EGate_TxnNo; | %var|EGate_TxnNo% |
| Reference retrieval number | &mvt:global:EGate_RefNo; | %var|EGate_RefNo% |
| Batch number | &mvt:global:EGate_BatchNo; | %var|EGate_BatchNo% |
| Authorization ID | &mvt:global:EGate_AuthId; | %var|EGate_AuthId% |
To view the module's settings screen, go to your store's Payment Configuration page in Miva admin. Then click the Credit card payments via eGate link. The upper part of the screen displays the settings that control the module's operation. The lower section has a table of credit cards that the module supports, and controls for adding, changing, or removing cards. The various settings in each section are described below.
NOTE: After changing any settings, remember to click the Update button in the lower right corner of the frame (you may need to scroll down to see it). |
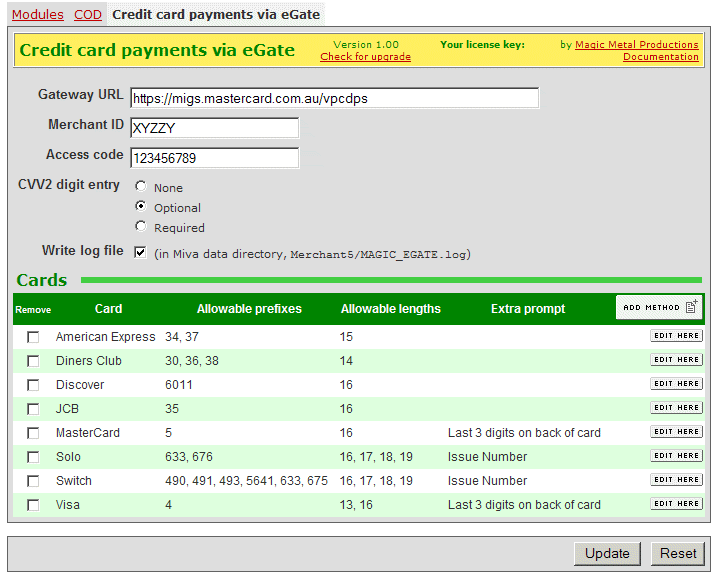 |
Type in the URL for your payment-processing server. Upon installation, this field will be set to a default URL. Your ANZ representative may give you a different URL.
For each of these fields, type in the code that you were issued for your ANZ merchant account.
If this checkbox is checked, the module will write information to a text file every time it exchanges data with the payment server. This feature is intended for troubleshooting, and should normally be unused (the box should be unchecked). However, it might be a good idea to turn logging on for a few days or weeks when you first install the module, to help troubleshoot any installation problems. If logging is on, the log file will be named MAGIC_EGATE.log, and will be located in the Merchant5 folder of your site's Miva data directory, which is usually named mivadata or htsdata. When logging is turned on, the log file's size will increase by a few hundred bytes for every transaction processed.
The CVV2 code is a set of additional digits that customers may read off their credit card and type in when they make purchases at your store. There are three possible settings for the module:
The module allows you to specify which credit cards it will accept. Upon installation, the module is pre-loaded with settings for most popular cards; you can remove or edit these as needed. For each card, you have the following settings:
| Card Type | The name of the card. |
|---|---|
| Allowable Prefixes | All credit cards of any type have card numbers that start with a certain digit, or a sequence of several digits. Enter the valid prefix(es) for the card, separated by commas. |
| Allowable Lengths | All credit cards of any type have card numbers of a certain length, or several lengths. Enter the valid length(s) for the card, separated by commas. |
| Extra Prompt | The text that is displayed next to the text box when the module asks for a CVV code. Some merchants prefer to call it a "Security code," or use a more specific prompt such as "Last three digits from back of card." |
After any of these operations, remember to click the Update button at the bottom of the page.