Card Magic
Module for Miva Merchant

Copyright © 2007, 2008
by Magic Metal Productions
Card MagicModule for Miva Merchant
|
|
This document gives instructions on installing and using this module for Miva Merchant shopping-cart systems. If you need additional details, check with your Miva or hosting representative or documentation. You can also request help by email to support@TheMagicM.com.
This document applies to Card Magic version 5.02 for Miva Merchant version 5.x, released September 2010. For Merchant 4.x, there is a separate set of files (module and documentation).
Card Magic allows your customers to save their credit card numbers in secure encrypted storage. After saving a card, when customers return to your store, they can check out quickly and conveniently, by picking the card from a menu, instead of re-entering the numbers and expiration date.
 |
 |
Card numbers are saved with strong RSA encryption to protect the confidential information. When a customer places an order with a saved credit card, the card is not immediately charged, because the card number and other essential data are encrypted. Card Magic provides a Pending Orders display where you can view these orders, enter the decryption password, and charge the cards with just a few clicks.
Card Magic can be used with any payment module that communicates with a payment gateway in the background, i.e., the customers stay in your Miva store during checkout; they are not transferred to another Web site to enter their card number. Card Magic can also be used with "passive" payment modules that simply store the credit-card information, and don't communicate with a gateway, such as the Miva "Simple Validation" module. Card Magic has been successfully tested with the following Miva Merchant payment modules:
Upon installation, Card Magic is pre-loaded with data to support these modules. To use a different module, you will need to manually collect and enter some data about the module (as explained in the section on "Payment modules" below).
|
Customer advisory Storing credit card numbers places a responsibility on you to keep them safe. Be sure to turn on the Encryption feature of the Miva store. Also, use good practices for store security, such as changing passwords regularly, minimizing the number of people who have access, and updating your software as needed to remove any vulnerabilities. Your bank or payment-processing company may have their own rules for handling credit cards. Failing to follow these rules could be a violation of your merchant-account contract, and could subject you to fines or other penalties. You may want to check with your account representative before you start using the module. Internet crime and credit-card theft are serious problems today. For the sake of your business and your customers, please operate your store safely. |
The procedure for installing this module is the usual one for Miva Merchant modules: add the module to the site, and assign it to the store. The procedure is explained below in a bit more detail. If you need more information, see your Miva representative or documentation.
To install the module in your domain, follow the steps below:
After the module is installed, you need to assign it to your store.
After the module is assigned to the store, a new "tab" link, labeled Card Magic, will be seen at the top of the right-side frame. Clicking this link will take you to the module's settings screen.
After completing the installation steps listed above, the first time you click the Card Magic link on the Payment Configuration page, you will need to enter your license key code. You should have received this code when you purchased the module, probably in an email. If you didn't receive a key, check with the dealer from whom you purchased the module.
Enter the key code in the text box on the page, review the Terms and Conditions, and then click the I agree checkbox. Then click the Update button in the lower right corner of the frame (you may need to scroll down to see it).
When you install Card Magic, it will attempt to modify the page template for the Payment Information (OPAY) page, in order to include the checkbox that customers use to save a credit card. If you have customized your page template, it's possible that Card Magic will be unable to correctly modify it. in that case, you will have to manually edit the template. To display the checkbox and explanatory message, add this tag to the page template:
<mvt:item name="cardmagic" param="save" />
This tag should be placed somewhere near the tags that display the text boxes and other input fields for the customer to enter their credit-card information.
In order to help your customers use Card Magic, it's a good idea to put some additional messages on your store pages. Since customers must log in to use Card Magic, you may want to put some messages on your shopping or checkout pages to encourage users to create accounts.
Also, you can add a message on the Invoice page to confirm to customers that their card is saved, and to show them how to use it the next time they visit your store. The following set of Miva tags and HTML code can be used for this. You can add this code to the template for the Invoice (INVC) page in a location of your choosing, probably just below the page headers and navigation bar.
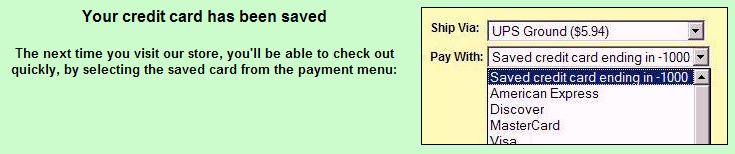
<mvt:if expr="NOT ISNULL(g.CardMag_save)"> <center> <table cellpadding="6" bgcolor="#ccffcc"><tr> <td align="center" valign="top"> <h3> Your credit card has been saved </h3> <b>The next time you visit our store, you'll be able to check out quickly, by selecting the saved card from the payment menu:</b> </td><td align="center" valign="top"> <img border="1" src="graphics/cardmagicmenu.jpg"> </td></tr></table></center> </mvt:if> |
The above code will generate a display similar to the one shown below. This will only be shown to customers who have just saved a credit card. The image file, cardmagicmenu.jpg, is included in the distribution ZIP file with the module; you are welcome to use this image in your store. You can use FTP to place it in a folder on your Web site. The exact path for the image will depend on what folder you put it in; it's a good idea to put it in the Miva graphics folder, or a sub-folder within it, as shown in the above code.
Card Magic allows customers to save their credit card numbers in your store, and to recall them for quick, convenient checkout. The saved card numbers are protected by the same strong encryption system that Miva Merchant uses for payment information in the Order Processing section of the admin pages.
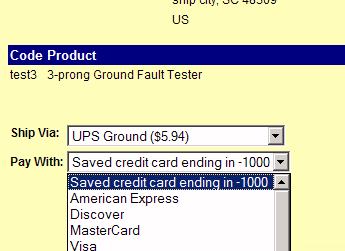
After a customer saves a card, the next time they visit your store, when they check out, the "Pay with:" menu will contain a new option labeled "Your saved credit card ending in –" followed by the last four digits of the card number. If the customer chooses this option, they can complete their checkout with just two more clicks of the Continue button; they won't need to re-enter the card number, expiration date, etc.
Note that customers must create an account, and log in to it, in order to save credit cards. You may wish to put messages on some store pages to encourage customers to create accounts, so that they will be able to save their cards. Some merchants set up their stores to require customers to create accounts.
Customers can save more than one card if they wish. (If a customer happens to have two cards that end with the same four digits, they will only be able to save one of them.) Expired cards are automatically removed from the system.
Once encrypted, the credit-card data can only be decrypted by entering a password, usually referred to as a passphrase in this context. The passphrase is never stored in a file or database on your Web server; you must manually enter it whenever it is needed.
Because saved credit cards are encrypted this way, they can't be decrypted automatically when a customer checks out of your store. This means that the store can't "run" or charge the card when the customer checks out. When a customer makes a purchase using a saved card, Card Magic places the order into a Pending condition. To actually charge the credit card for a pending order, you must log in to the Miva admin, enter the passphrase, and click a button to charge the card.
Note that some payment modules, such as the Miva "Simple Validation" module, do not actually charge credit cards; they just save the card number and other information so that you can manually process it later. These modules can be used with Card Magic. If you are using such a module, while reading this document, keep in mind that for your store, "charging the card" just means storing the information so you can view it later.
There are two ways to charge a pending order:
Both these options are described in detail below.
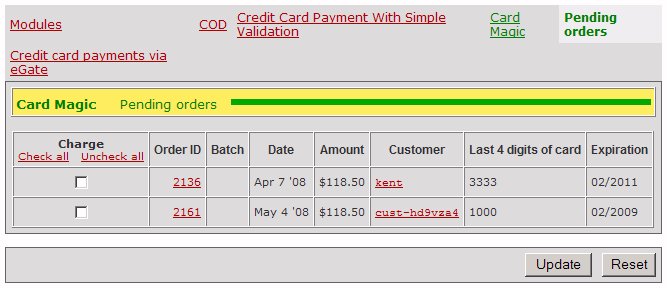
In the Payment Configuration section of the Miva admin, along with the Card Magic link, there is a link labeled Pending orders. Clicking this link displays a list of all the pending orders in the store. For each order, Card Magic displays:

If you use the Order Processing features of the Miva admin, you know that when you view an order, there are three links at the top of the page. The first one displays the customer information, such as name and address; the second one displays the items that were ordered; and the third one gives information about the payment processing. The third link is generally labeled with the name of the payment module. When a customer checks out with a saved credit card, the third link will read Card Magic.
The Card Magic payment data includes the last four digits of the card number, expiration date, and the login name of the customer. The login name is a link that you can click to quickly access the Customers section of admin, in case you want to view additional details about this customer.
The payment data page also includes a link that you can use to charge the credit card. Clicking this link will take you to the pending-orders page, where you can enter the passphrase; then Card Magic will decrypt the data and charge the credit card.
After an order has been charged, all the data in the Miva order database will have the same contents that it would if the order had been placed normally, i.e. without using a saved card. You can run batch reports, export the data to other software, etc. The charged orders will be completely compatible with these applications.
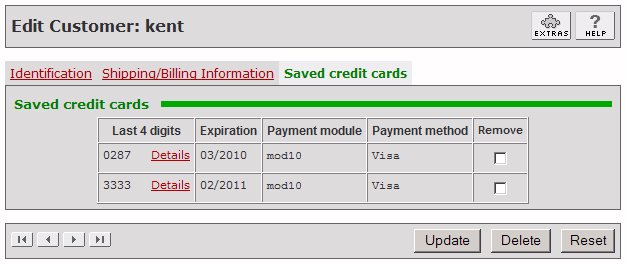
In the Customers section of the Miva admin, Card Magic adds a new "tab" link at the top of the right-side frame, labeled Saved credit cards. This link displays a list of all credit cards that the customer has saved. For each card, the list displays:
Each card also has a Remove checkbox. You can delete one or more cards by checking the box(es) and clicking the Update button at the bottom of the page.
To view the module's settings screen, go to your store's Payment Configuration page in Miva admin. Then click the Card Magic link. The upper part of the screen displays the settings that control the module's operation. The lower section has a list of payment modules that Card Magic supports, and text boxes where you can add support for additional modules. The various settings in each section are described below.
This part of the screen displays settings that control the operation of the module and the appearance of various page elements. When changing any settings, remember to click the Update button at the bottom of the page (you may need to scroll down to see it).
This checkbox enables or disables the checkout features. If the box is unchecked, the "Save card" checkbox is not displayed to customers, and saved cards are not listed in the "Pay with" dropdown menu. However, you can still use Card Magic's admin features, such as charging cards or viewing data on the various pages. In order for your customers to use Card Magic's features, you must check this box.
If you check this box, Card Magic will rearrange the options on the "Pay with" dropdown menu, so that saved credit cards appear at the top. This will remind your customers that they saved a card, and encourage them to use it again for quicker checkout.
This set of radio buttons controls whether the "Save card" checkbox is initially checked or unchecked when it is displayed to customers. You can have the box be initially checked if you want to encourage customers to save their cards. Note that this may result in some customers saving their card unintentionally. Some customers are sensitive about having personal information stored on Web sites that they visit; to protect their privacy, you may prefer to have the checkbox be unchecked unless the customer manually chooses to check it.
This text box lets you set up the text and HTML code that is used to display the "Save card" checkbox. You may wish to include explanatory text, logo images, or use different fonts or colors to highlight this feature of your store. The text in this box must include the special token %box% to indicate the position of the checkbox itself. Upon installation, this text will consist of the token, plus a short message for customers, and some HTML codes to display the message neatly.
This text box lets you set up the text and HTML code that is displayed to customers on the third checkout page (OPAY) above the Continue button when they choose to pay for their order with a saved card. This text is optional; you can delete it if you want. However, since the store normally displays some text boxes or other input fields here, it's a good idea to give the customers a bit of explanation.
This text box lets you specify whether batch reports will contain the entire credit card number, or only the last four digits. For security, it's best to include only the last four digits, simply because the fewer places that you display card numbers, the less chance there is for theft or fraud.
NOTE: if you are using Stone Edge Order Manager (SEOM) for off-line processing of orders, and you want to use SEOM to charge the credit cards for orders that your customers place with saved cards, then you must select the "entire card number" setting for batch reports.
If this box is checked, Card Magic writes information to a text file every time it saves a card or uses a saved card to charge an order. This information is mainly intended for troubleshooting in case any problems occur. You may wish to turn this feature on when you first install the module, and turn it off after a few days or weeks when you are satisfied that the module is working correctly.
The log file name is MAGIC_CARD.log. It will be found in the store data folder, which is usually a subfolder named Merchant2/00000001 within your site's Miva data directory. The data directory is usually named mivadata or htsdata. The exact locations of the data directory and store folder will vary, depending on how your site is configured; if necessary, ask your hoster for help finding them.
Card Magic writes a line of text to the log file whenever a customer checks out of your store and saves a credit card, or uses a saved card to pay for an order, as well as when you charge a saved card from the admin. Each line of text consists of several data fields separated by tab characters:
To save a customer's card, Card Magic collects information from the payment module that processes the order. Later, when you charge an order that was placed with a saved card, Card Magic passes this information back to the payment module. All payment modules have their own unique way of processing this data, so Card Magic needs to have some information about how to communicate with any payment module that you want to use.
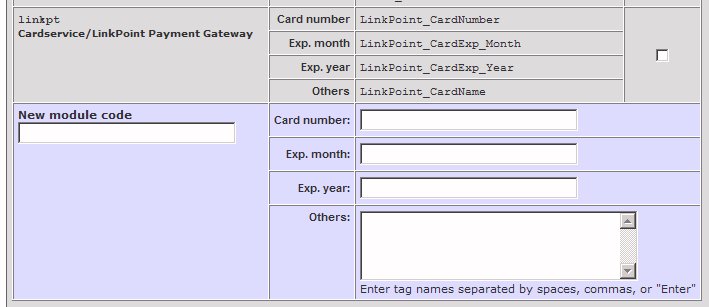
Upon installation, Card Magic is pre-loaded with information about many of the most popular payment modules that are used with Miva Merchant. This information is displayed in the Payment Modules table in the lower part of the settings page. If your module is listed in the table, Card Magic is ready to use; you don't need to add any data to the table. If your payment module is not listed in the table, you will need to enter the required data in the text boxes at the bottom of the table.
NOTE: the procedure for collecting and entering payment-module data requires reading the HTML code for two store pages. If you are not familiar enough with HTML to do this yourself, your hoster or Web developer should be able to do it in just a few minutes by following the instructions below.
<SELECT NAME="PaymentMethod"><OPTION VALUE=""><Select One></OPTION> <OPTION VALUE="mod10:American Express">American Express</OPTION><OPTION VALUE="mod10:Discover">Discover</OPTION><OPTION VALUE="mod10:MasterCard">MasterCard</OPTION><OPTION VALUE="mod10:Visa">Visa</OPTION> <OPTION VALUE="cod:COD">COD</OPTION> </SELECT>
It's easier to read if you put in some Newlines:
<SELECT NAME="PaymentMethod">
<OPTION VALUE=""><Select One></OPTION>
<OPTION VALUE="mod10:American Express">American Express</OPTION>
<OPTION VALUE="mod10:Discover">Discover</OPTION>
<OPTION VALUE="mod10:MasterCard">MasterCard</OPTION>
<OPTION VALUE="mod10:Visa">Visa</OPTION>
</SELECT>
The VALUE attribute of each OPTION tag contains a module code and a method code, separated by a colon. In some cases, the method code is the actual card name, such as American Express. In other cases, the method code may be an abbreviation such as AX.
If your store contains more than one payment module, you may see more than one module code here. In that case, make note of all codes for modules that do credit-card processing.
<INPUT TYPE = "text" NAME = "MOD10_CardNumber" SIZE = 20 VALUE = "">
The expiration month and year are probably set by drop-down menus; the HTML for each one will look something like this:
<SELECT NAME = "MOD10_CardExp_Month">
<OPTION VALUE = ""><Select One></OPTION>
<OPTION VALUE = "1">1</OPTION>
<OPTION VALUE = "2">2</OPTION>
<OPTION VALUE = "3">3</OPTION>
<OPTION VALUE = "4">4</OPTION>
<OPTION VALUE = "5">5</OPTION>
<OPTION VALUE = "6">6</OPTION>
<OPTION VALUE = "7">7</OPTION>
<OPTION VALUE = "8">8</OPTION>
<OPTION VALUE = "9">9</OPTION>
<OPTION VALUE = "10">10</OPTION>
<OPTION VALUE = "11">11</OPTION>
<OPTION VALUE = "12">12</OPTION>
</SELECT>
This section describes Card Magic's features for integration with other Miva modules.
When a customer uses a saved card, you may want your store to retrieve the last four digits of the card number, so they can be included in emails or used by other modules. Card Magic saves these digits in a Miva global variable named g.CardMag_digits . You can include the digits in any Miva page template, or other "managed" templates, by using the symbol &mvt:global:CardMag_digits; . For more specific details on how to include the digits in other modules, consult the other modules' documentation.
Card Magic is compatible with Stone Edge Order Manager and its companion Miva module. See "Batch reports" above for details.
Is Card Magic compatible with (insert your favorite module name here)?
See the section on "Compatibility". Open Tokens are very versatile, and can often be used to provide interaction between modules that support them.
What happens if a credit card is expired?
Whenever a customer goes to checkout, the module automatically checks the saved cards for that customer, and deletes any that have expired. When you view saved cards on the admin pages, expired cards are marked in red, but they are not automatically deleted. You can manually delete them as described above.
Why doesn't the module store card security codes (CVV)? Can I make it do that?
Card security codes should never be stored in a file or database. They should only be saved long enough to transfer the information to the payment gateway, which is a matter of moments for Web stores. Saving these codes could be a violation of your merchant-account contract, and could subject you to fines or other penalties.